![]() Vertex Shading
Vertex Shading
![]()
![]()
![]()
![]()
![]()
![]()
![]()
|
|
|
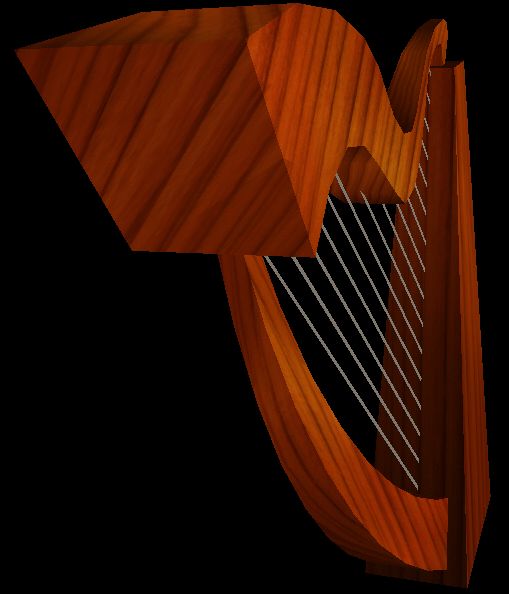
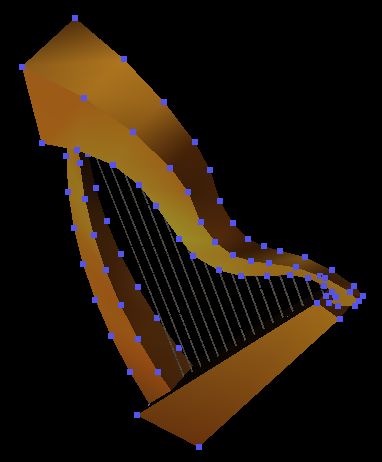
[First posted March 25, 2004. Last updated March 28, 2004] This is an advanced modeling tutorial. Please read other tutorials found here first, before attempting to do vertex shading for There. At least, read the shark modeling tutorial briefly, if you are an experienced modeler who is starting to model for There. Vertex coloring in Gmax isn't an intuitive exercise. We will also be using Gmax lighting in combination with vertex coloring. The awkward Gmax user-interface, the bizarre There exporter behavior and the lack of support for smoothing groups in There will drive you crazy at times. I myself spent many hours working in the dark, until I finally understood how things worked. Thanks to Yoshitoshi's excellent material tutorial and Phedre's help, I was able to shorten my research considerably. I must also acknowledge Yoshitoshi's continued revision of this tutorial as I worked on it. I am learning even as I write it. For this tutorial, I'll use the Floor Harp I modeled. This was my first attempt at vertex shading. If I make a mistake or spread inaccurate information, please email me with correction. Following pictures show the final result that we would like to achieve using vertex shading. These are screenshots taken in the Previewer. This represents what users will see in-world, when the model is approved. Notice the difference in brightness between various surfaces on the harp. Also notice the level of details in the texture. The harp does not show the dull result which is typical of repeated tiling of a small texture map. Click on following thumbnails to see them at full resolution.
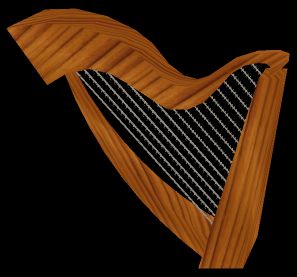
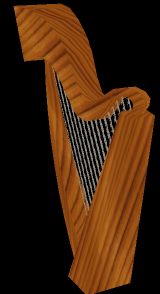
Why Do We Need Vertex Shading at All? Some smart readers may start to wonder, "why can't we simply create a model with some wooden texture, and let There's run-time engine shade surfaces and cast shadows according to lighting properties in each region in-world?" Argh.... perhaps you haven't spent enough time in-world. Have you ever seen any shadow in-world? No, There engine does not cast shadows on objects. In fact, the engine doesn't seem to do proper 3D shading, either. I do not see evidences that directional light sources exist in There. It looks like there is only ambient lighting. As a result, builders regularly paint shadows and shading into their texture maps. The basic steps are: edit UV map, take a screenshot of UV map and paste it into your texture as a layer, paint your texture against UV map, and finally darken or lighten parts of your texture to bring out contrast between 3D surfaces. However, texture maps painted with explicit shading do not lend themselves to texture tiling. Texture tiling is a useful technique in There modeling, due to the low texture pixel count given to most builder templates. By tiling your texture map, you can stretch your UV map so that a small texture is tiled many times to cover a surface. Of course, you want to use seamless texture maps in this scenario. When using tiled texture, one cannot paint shading information into it, because the same area of the map appears on different surfaces on the 3D model. As a result, tiled textures generally make the final 3D model look dull, because of lack of shading. Now compare the following screenshots of the same harp without shading, against those shown above. Due to lack of shading, it is hard to see clean edges, which may be advantageous in some types of models. In my particular harp, however, I wanted to accentuate hard edges to create an interesting contrast against the curved surfaces.
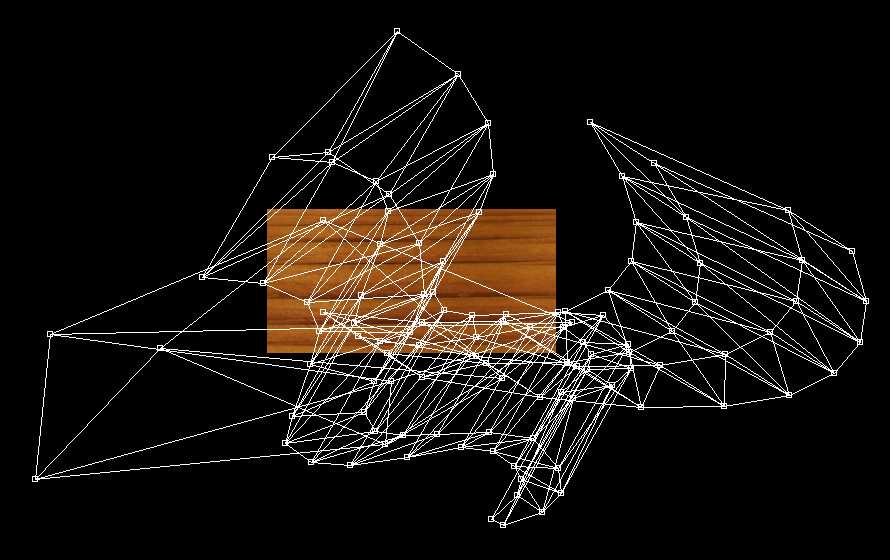
In case you wonder how I tiled the texture, following UV map layout will answer your question. Click on the following thumbnail to see a high resolution layout. As a side note, There exporter doesn't recognize the 'mirror' setting in material editor and it ignores the tiling 'number', too. Only simple tiling is supported, it seems.
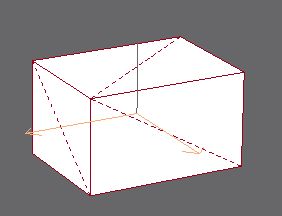
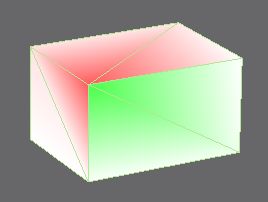
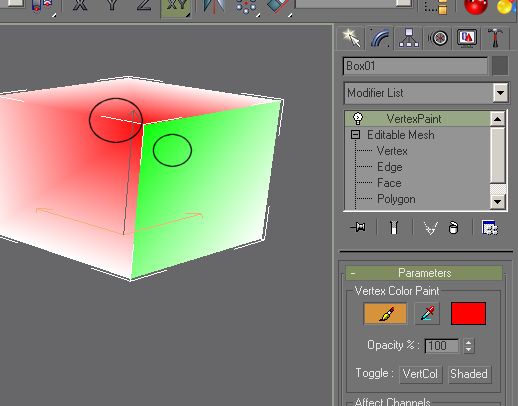
What is Vertex Coloring? In order to breathe life into this model, we need to use Vertex Coloring in Gmax. You may want to quickly read the (confusing) help pages for Assign Vertex Colors Utility and VertexPaint Modifier in Gmax, in order to get an idea of what they are. Don't dwell on details. These help pages are confusing and don't give you good examples to illustrate how vertex coloring actually works. Texture map isn't the only way to apply colors to the surface of your model. Surface colors are also modified by vertex colors. Initially, objects you create in gmax get white as the default color for their vertices. A surface's color is affected by vertices that surround it. This is best illustrated by an example. Don't worry about replicating this exercise right now; I'll cover the procedures for vertex paint, etc. later. I created a cube and converted it to a mesh. I checked some settings in gmax to make it show surfaces as colored by vertex color (don't worry about the procedure now). I added the VertexPaint modifier, and proceeded to paint one vertex green. As a result, all surfaces around the green vertex become partially green.
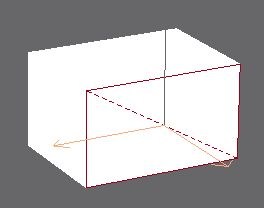
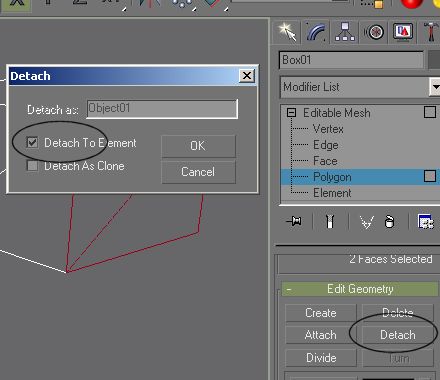
Notice that vertex coloring actually blurs edges between faces. In some instances, this is a desirable effect. If you want sharp edges, however, you will need to instruct gmax to stop sharing vertex color between adjacent faces. This is normally done using Smoothing Groups. HOWEVER, the There Exporter does not support smoothing groups. You can create wonderfully looking vertex coloring using smoothing groups in Gmax, but the effect doesn't survive the export process. Basically, There does not support smoothing groups and exporter simply ignores it. As a result, we need to find another way to create sharp edges, when using vertex coloring. Yoshitoshi has written an excellent material tutorial which you may want to check out (I recommend that you save this 5MB file to disk before opening it). He explains the lack of smoothing group support and gives you a workaround. The idea is to use detaching and attaching of sub-object selections (e.g. a group of faces) to break vertices. When a vertex is broken, there is one vertex for each face. And you can color each vertex differently. By detaching the side polygon and coloring broken vertices in different color, I have now created a sharp edge. Notice that this technique creates extra vertices which you cannot weld back (otherwise you lose your hard edges). So think about your vertex budget before attempting to do this.
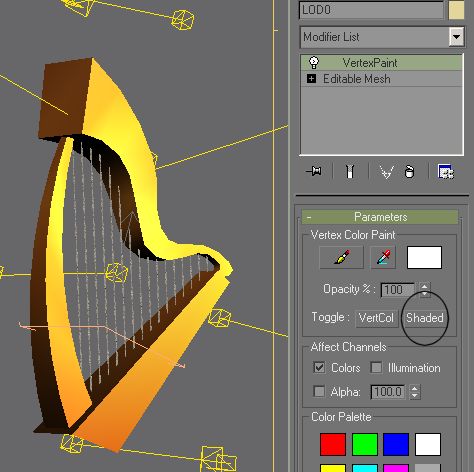
Following pictures show the result of vertex coloring on surfaces of the harp. I haven't quite figured out how vertex color and texture map color interact. Perhaps a simple averaging of RGB values is used. I have noticed that grayscale vertex colors tend to wash out texture map colors (i.e. it seemed to lower saturation). So I use the same color of wood to create vertex colors. When combined with texture map, vertex shading creates the final harp shown in the beginning of this tutorial.
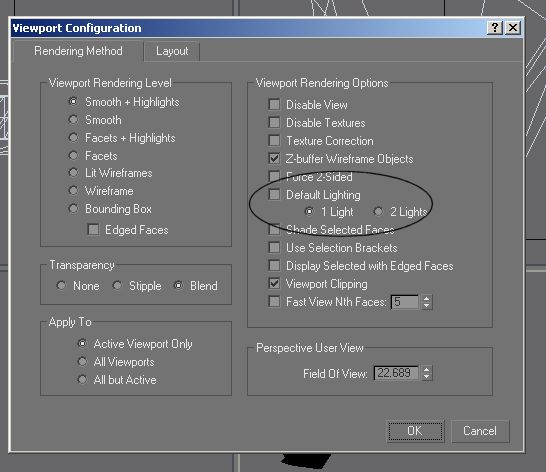
The model image you see in gmax perspective viewport is determined by viewport settings, object settings and lighting object settings. Each combination of settings create different kinds of shading, often to your surprise. Sometimes you scratch your head, trying to figure out why you see a black object without any color. I will describe each setting that can change viewport shading individually. Then I will give you a table that shows how combinations of these settings affect actual rendering of your model in gmax. You need to master these settings before attempting to paint colors on your vertices; after all, you can't paint properly if you don't see what you are painting. Viewport Configuration | Default Lighting You can access this page by right clicking on the viewport label, then choose configuration. Depending on the actual selection of 1 light vs. 2 lights, you will see slightly different rendering of your model in the viewport. If no light exists in your scene, default lighting is used, even if you have this field unchecked.
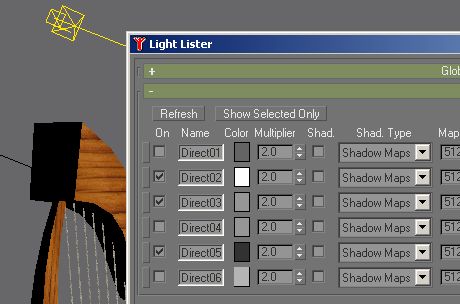
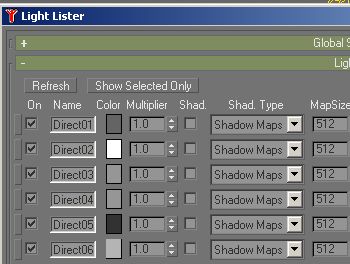
Light Objects If you have at least one light object, you can turn off default lighting in the viewport. You will then see the effect of your lights in your scene. You can turn off individual light objects by clicking on the 'on' box. Turned-off light objects appear black in the viewport. You can also use Light Lister to manipulate multiple light objects in one convenient dialog. Notice that you can hide/unhide light objects from your scene without affecting their on/off behavior. If you are not using default lighting and all your light objects are turned off, your model will appear completely black in the viewport.
Object Properties | Vertex Color Check the Vertex color checkbox, if you want to see vertex colors. When you check this box, default lighting and light objects in your scene are ignored. Your object is rendered with just its vertex colors, if you haven't assigned a texture material to this object. If you have already assigned a material with texture to this object, then you will see the combined effect of both texture and vertex colors. When the box is checked, what you see in the viewport is very close to what you will see in the Previewer, after you export gmax scene to .model file.
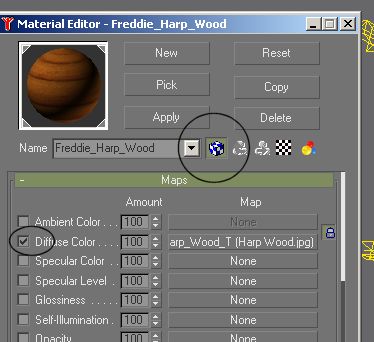
Object Properties | Vertex Color (Shaded button) Check the Vertex color Shaded checkbox, if you want to light the scene with turned-on light objects, and you want to include vertex color in the shading process. Initially, I could not think of a reason why I would want to use this for There modeling, since I was going to emulate light effects by explicitly painting vertices. At any moment, I would be either looking at my scene using light from light objects or using vertex colors. I thought these were two mutually exclusive tasks. I changed my mind, after I struggled for an hour trying to make gmax show just my vertex colors (without texture effects). I finally realized that I needed to use Shaded option to see my vertex colors alone. If you have assigned a material to your model, but want to eliminate the texture from rendering temporarily, you can either disable the diffuse map in the Material Editor or turn off the Show Map In Viewport option. You can then turn on the 'Shaded' option, and turn on all your lights. You will then see the effect of vertex colors alone. For some models I experimented with, I didn't need to turn on Shaded to see just vertex colors. For others (e.g. the harp), due to unexplained reason, I see a purely white harp, if I don't turn on the Shaded option. Notice that with Shaded=on, your model is rendered brighter than it really is, because the surface is lighted twice (vertex color + light). You can verify this by picking colors from surfaces on your object, and comparing the color that appears in the small color box against the source.
Combination of Settings that Affect Object Rendering This table gives you a summary of combinations of settings. If you find yourself looking at strangely rendered objects in your viewport, come back to this table and you will quickly find out what went wrong. Each row is indicated by a combo number which we will refer to later in this tutorial.
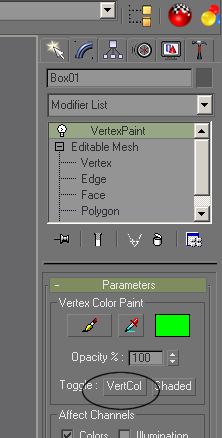
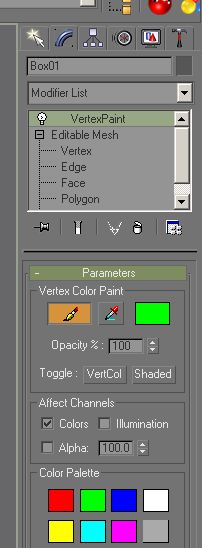
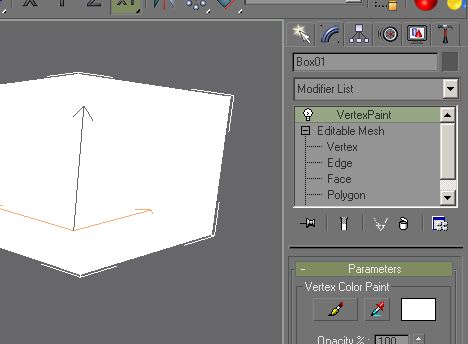
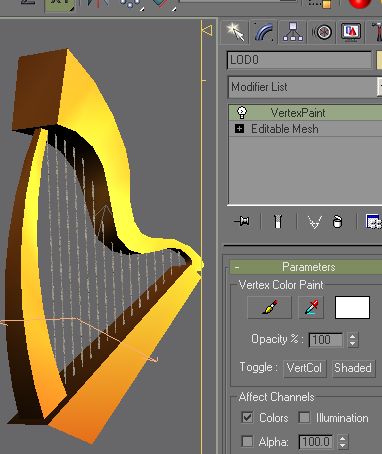
VertexPaint Modifier Let's practice vertex painting first. Start up gmax with a new scene file. Add a box and convert it to mesh. Add a VertexPaint modifier to the stack, and check the VertCol button. Your box should now be rendered in pure white (default vertex color). You are now using combo 2 setting. That is, the object does not have assigned material and no default lighting or light object is applied in rendering. You are looking at surfaces rendered purely based on vertex colors. Now, choose a color from color palette and click on the Paint Vertex Colors button. You can now click anywhere inside your cube to paint vertices.
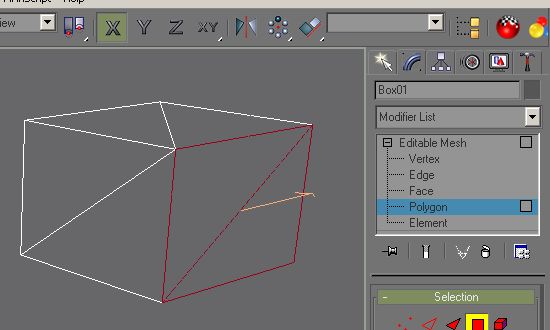
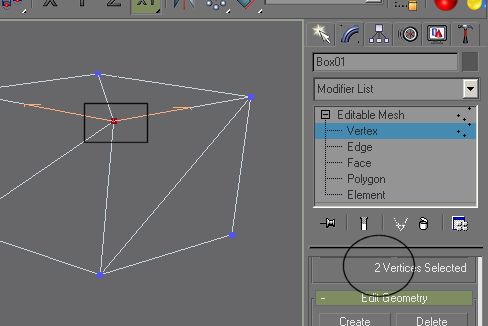
Creating Sharp Edges Now, let's practice the art of detaching, in order to create sharp edges. Delete the VertexPaint modifier from the stack, then detach the side polygon into an element of its own. This will break vertices which were originally shared by three polygons. I change the view to show wireframe instead of vertex color. Notice that when I select the marked vertex using selection rubber band, it actually selected 2 vertices. This confirms my earlier statement that detaching produces extra vertices, which you need to watch carefully, in order to keep your model within vertex budget.
We now switch the view back to show actual vertex colors. You can click on the two places indicated by circles using different colors to assign distinct colors to the two distinct vertices that reside on the same 3D location.
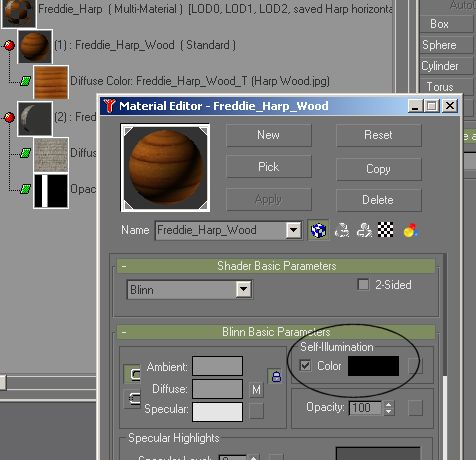
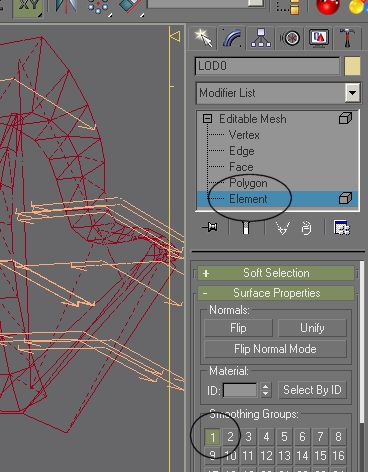
Lighting Your Scene Armed with the knowledge you have just acquired about vertex colors settings, vertex painting and face detaching, we can now proceed to create vertex shading for the harp. We can paint each vertex on the harp manually using VertexPaint, but there is a better and more efficient way to create a first cut vertex shading. Gmax provides a utility called Assign Vertex Colors utility which can take shading effect created by scene lights, and assign those values onto appropriate vertices. This creates very realistic and convincing vertex shading. All you have to do is to create and adjust light objects interactively until you are satisfied with the shading, then you press one button and you are done. Assuming that we have now assigned a texture material to the harp, switch to Combo 7 settings. Also, I check the self-illumination checkbox, so that the harp will be rendered with different light intensity at different in-world locations. This setting is equivalent to Lit=on in the Previewer. You should always set the self-illumination checkbox in gmax. The previewer setting is ignored by the approval process. Only flags set in the .model file count. Furthermore, you should make sure all faces in your model use the same smoothing group, so that gmax viewport does not show sharp edges where there isn't one (remember, as far as There modeling is concerned, you can only create sharp edges using the detach-to-element trick).
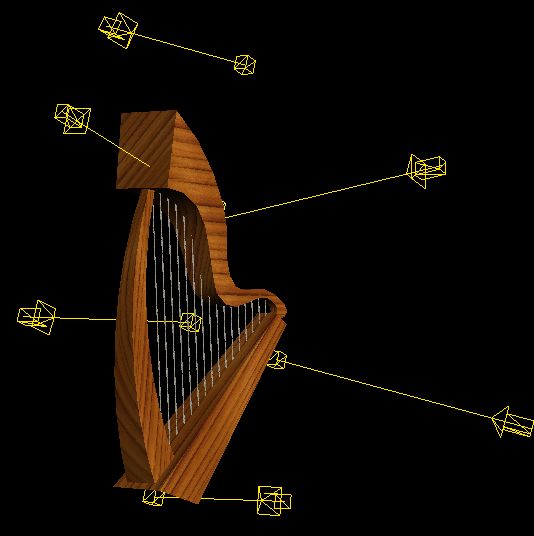
You may want to read gmax help on lighting. Gmax help pages on lighting are pretty well written. I use target directional lights, because they allow me to get precise lighting on different surface. Because the light rays are 100% parallel, I can light up one side of the harp without affecting the other 5 sides of the harp (four of which are perpendicular to the side I want to light). I also adjust the value (or intensity) of some lights to make them less bright on some sides.
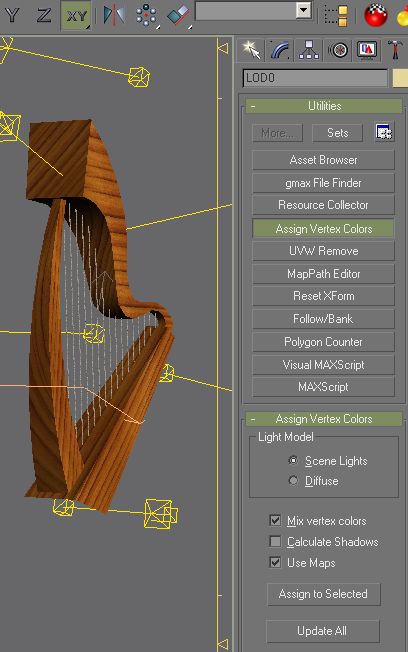
Assign Vertex Colors Once you are happy with the lighting effect, select your model (i.e. Harp), and turn on Assign Vertex Colors utility. Make sure you check Scene Lights, Mix Vertex Colors and Use Map. As explained before, There Exporter does not support smoothing groups. As a result, you want to check Mix Vertex Colors to emulate what the exporter does (i.e. drop effect of smoothing groups on vertex color sharing). You don't have to check this box, as it will have no effect whatsoever, as far as your final .model is concerned (when viewed in the Previewer). But if you don't check it, you may be mislead by the rendering of your model in gmax viewport. It is better to see the same vertex color sharing in gmax, so you know what to expect, then you export your model. Again, if you want to create sharp edges, you should have detached surfaces into elements explicitly earlier. You don't really need to check the Use Map option, if you don't care about getting washed-out colors (or if you want such effect). Without Use Map, your vertices will be painted using grayscale palette, according to lighting intensity and normal angles. I found that this usually washes color off the final surface rendering. I check Use Map, so that colors from my texture map is used to paint vertices. When you are ready, hit the Assign To Selected button. If you go back to the Edit panel, you should see a Vertex Colors modifier. You can't edit this modifier. You should simply collapse it. You need to collapse this modifier before exporting your scene to .model format.
Before exporting to model format, examine your final result in gmax previewer, by switching to Combo settings 3. You will now be rendering your model with both texture map and vertex colors. If the result of Assign Vertex Colors doesn't look like what you had using Combo settings 7 (rendered by light objects), then perhaps you did not make sure all faces shared one single smoothing group. That is, Combo 7 gave you sharp edges that disappear after Assign Vertex Colors operations, such that you see blurred edges in Combo 3. To see the effect of vertex colors alone, switch to Combo settings 5.
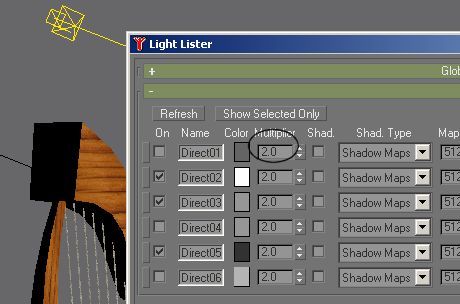
If you are not 100% satisfied with the result, you can always use VertexPaint to give your vertex colors a final touch. Exporting to There Model Format It seems like you need to be in Combo Settings 3, when you export your .model file, in order to for the exporter to recognize your vertex colors. Your mileage may vary. Turn off your lights and hide them (otherwise the exporter will complain about too many root nodes in scene). You are now ready to do File | Export, so go ahead and do it. Open the .model file in the Previewer. I believe only the Light=None menu item shows your model as it would appear in-world. All other lighting options seem to contain both ambient light and a strong front light. It will make your front side much brighter than it really is. I have noticed that the vertex colors appear darker in the previewer. By trial and error, I found that I needed to boost all my lights by x2 in gmax, in order to get the same color intensity in the Previewer. So, if your model appears extremely dark in the Previewer, you may need to go back to gmax and type in 2.0 in the light multiplier field. Then you need to re-assign vertex colors.
Miscellaneous Problems and Solutions Gmax sometimes creates .gmax files which are corrupted (e.g. they can't be re-opened into gmax). It happened to me several times, especially when I save the file when the Vertex Color checkbox in the Object Properties is checked. I save backup files manually quite often, in order to recover from corrupted files. Also, I reload my .gmax file once in a while, to check that files I saved were not corrupted. After all, you can keep making backup files of corrupted .gmax file, and they will be of no use to you. You need to detect corrupted files as soon as possible. In the rare case that you need to restore stuff from a corrupted gmax file, you can often load up a backup version of your scene, then use File | Merge to retrieve contents from your corrupted file. Sometimes the There Exporter complains about "Too many root nodes", when in fact, there is only one 'visible' root node in the scene. I have found that you can workaround this by creating a dummy object, and linking all lighting objects under this dummy object. Once you hide the entire dummy object tree (including lights), the exporter is happy. Sometimes the exporter doesn't care about lights. Sometimes it does. I haven't figured out why it is so temperamental. In all cases, I turned off all lights and hide them. But somehow the exporter still sees them. More Examples Drums are vertex shaded, so that I could use a very small wooden texture to render the side of the drum, while dedicating 2/3 of the texture budget for the drum face (texture & cutout).
The wireframe rendering will show you how this is done. The first one shows two-sided wireframe. The second one shows one-sided wireframes.
|